I mention here that I didn’t have a camera to make use of an expired roll of Kodak Super XX that I had acquired. Well the wait is over and I’m sooo pleased I waited.

Hood up…or Down

I have a soft spot for all things Yashica, having a number of SLR’s but no TLR. I like the high quality fit and finish along with their general ergonomics. So it was no surprise that when I saw this camera and the price that was attached, £55, I snapped it up for the bargain I hoped it was.
Looking at the front of the camera.
The white dial on the left controls the Shutter speed and the green tipped lever is the Shutter cocking lever. The white dial on the right controls the Aperture and the yellow tipped lever controls which type of flash is used.
Above the Flash Synchronization Terminal on the bottom right is the red tipped Self Timer lever. On the bottom left is the Shutter release button

Turning to the sides.
A useful depth of field guide is provided on the Focusing dial and perhaps a not so useful film memo dial. The only other thing is the accessory shoe.

On the other side is the black film winding knob. Inset into this we find the “Exposure Setting Reading Scale”. Fancy title for what is essentially a guide to shutter and aperture values for any given light meter reading taken with built-in light meter. Above and on the left is the film reset lever which is used in conjunction with the film release button in the centre of the film rewinding knob.

Around the top of the viewing lens is the shutter speed and Aperture window.


The built-in light meter is what elevates this model above the standard 44.
Lifting the Focusing hood reveals a magnifying glass to help in focusing. In addition there is what is called a sports finder window??

I wanted to try the camera out before using the Kodak Super XX so looked into using 35mm film first. I could take out the top roll bar in the film chamber which allows enough space to drop a 35mm film cannister in. But the idea of taping up the rear red window just didn’t seem right to me with such a nice looking camera 😮 Fortunately I had kept the paper from the roll of 127 film I developed (here). So I pursued respooling 35mm film onto 127 backing paper.

I placed a piece of tape at the beginning and the end of the backing paper to which I would tape the 35mm film. This would prevent the backing paper from being torn and also help as clues to where I should cut and tape the film while in the changing bag.

So with the backing paper at the end of the film I taped the film emulsion side uppermost. This was done before going into the changing bag.

Then it was a matter of rolling the film out of the film loader onto the backing paper and using touch to try to keep the film centred on the backing paper.

Finally taping the start of the film.

The finished product!

Putting the film into the camera required unlocking the film chamber located on the base of the camera.

Placing my roll of film in the upper chamber.

Attaching the film leader to the lower spool.

Closing and then locking the film chamber I could then turn the film wind on until the number 1 appeared in the red window of the camera.

Having accomplished that, then required resetting the film counter by sliding the lever on the left whilst pressing the lower film release button.

I was then ready to take my first photo. Here are the steps that I had to consciously follow.
1.Lift Focusing Hood.
2. Take a light meter reading.
3. Set metered value to the exposure scale dial and select which combination I wanted to use.
4. Transfer shutter Speed and Aperture to respective dials. The manual states that this must be done before cocking the shutter.
5. Focus.
6. Set shutter cocking lever.
7. Release shutter.
8. Wind film on.
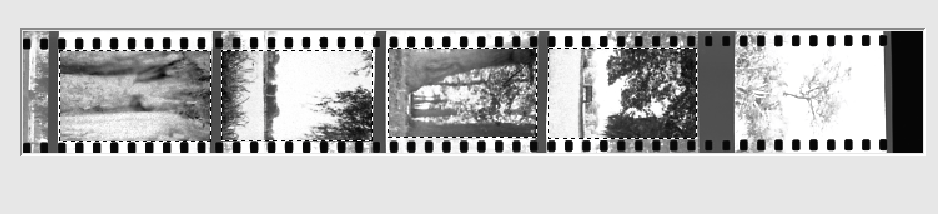
Having finished the film and developed it, how would the pictures turn out when I scanned them?

Wait a minute that isn’t right! I had used a hand held meter for this image. It then dawned on me that the scanner was taking the sprocket holes into consideration when scanning and over-exposing the negative causing the blown out look. But how do I stop it doing that while keeping the sprocket holes?
After a little research I discovered that I would manually have to select that area inside the sprocket holes of the image first inside the Epson Scan software with Continuous auto exposure turned on.
Then going into the Configuration tab I had to deselect the Continuous auto exposure.
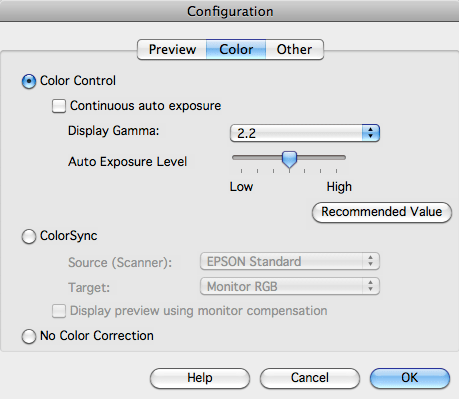
Then I could go back and include the sprocket holes in the images.

Sorted!


On the Yashica 44 LM, film advance and cocking the shutter are separate operations. Despite my best intentions I forgot to wind on the film which resulted in a rather interesting double exposure.


I’m not quite sure if the blurred centre which was present in some images is a characteristic of the lens, some aberration in my scanning process or simply a fingerprint?
With all the manual mechanical inputs in the Yashica 44LM using it is a very tactile experience. The way you cradle it in your hands, lift up the focusing hood through to finally pushing the shutter release button, is a very deliberate and thoughtful exercise. A very very enjoyable one and I have learned a great deal about this camera.☺️
The 44 LM – Me Like.

I have just got one of these and you helped me resetting the film counter, thanks. I have shot 35mm in 127 in the past and sometimes get the soft focus on some shots. I think the film curls due to the larger masked area, not a lens issue.
LikeLike
Yes I think you’re right. The film doesn’t lay completely flat, makes for some interesting results.😁
LikeLiked by 1 person
When the 44’s work they are great cameras to use, as you found out. I would definitely give it another clean and what great excuse to go out and regularly use the camera😁
LikeLike